The city of Minneapolis website has a wealth of information related to bike parking: where you can and can't lock up your bike (stop signs are a no-go, as I recently learned), the bicycle corral options for businesses that want to add bike parking, a cost-share program for schools and parks and other public facilities that plan to install bike racks.
"But there's not anything saying, 'Here's how you, as a property owner, could do this in your boulevard space," says Minneapolis resident Laura Mitchell. "Even though, as I've come to find out, you can do it... it was not easy to find out."
Mitchell is the board chair of nonprofit Our Streets Minneapolis, where she advocates for making walking and biking in the city safe for everyone. Her family uses bikes as their primary mode of transportation, and they also have a number of friends and family members who visit their south Minneapolis house by bicycle. So earlier this year, she decided to find out what it would take for her family to get their own residential bike rack.
"Our home is on a bike lane—it's on First Avenue—but we happen to have a retaining wall and a tall front yard," Mitchell says, adding that there aren't any sign posts on their side of the street. "As folks are increasingly riding around on larger, heavier, especially electric bikes... it's way too hard to get up our block."
Even as a property owner, you don't own the boulevard in front of your house, so Mitchell was somewhat wary of installing any kind of bike storage solution without consulting with the official channels.
"There's definitely some folks around the city who have done this without getting permission, and that was an option that I was willing to consider," she says. "But I also wanted to see what this process is like so that I can then tell folks how to do it the quote-unquote approved way."

Step 1: Obtain an Encroachment Permit
Mitchell's bike rack journey started in early May, on Twitter, where she asked, "Would the city of Mpls actually care if I add a single bike rack in the boulevard space between the sidewalk and street in front of my home? Anyone tried it before?" A city planner saw the tweet and replied with the magic words she needed to kick off the process: She needed an encroachment permit.
The city's website talks a bit about uses for encroachment permits—and you can find the application form here. "But even in that process, it doesn't specifically call out: 'An encroachment permit would be good for bike parking,'" says Mitchell, who happens to be married to Racket's brand-new beer columnist, Nissa Mitchell.
She downloaded the form, a straightforward enough one-page PDF that requires basic personal and property info along with a description and a small drawing of the plans of what you're trying to build. The form can be submitted by email, tactile mail, or in person to the Minneapolis Public Works office, along with a non-refundable $50 check made out to the "Minneapolis Finance Department."
This first step was not without hurdles: missing attachments in replies from city workers, a confusing request for "certification of insurance" requiring an "endorsement" on the insurance policy listing the city as a co-beneficiary. ("Are you kidding me?" Mitchell says. "For a metal bike rack?") Mitchell simply submitted proof of homeowner's insurance, which did the trick.
The back-and-forth with Public Works continued for about a month, and eventually Mitchell signed a contract stating the plan and outlining the location, as well as acknowledging that the city owns the property and could dig up the rack in the future if maintenance required it.
Step 2: Call Before You Dig
While this back-and-forth with the city was going on, Mitchell contacted Gopher State One Call to check for underground utilities.
This part of the process was pretty straightforward. Mitchell says it was easy to get in touch with Gopher via its website, and after providing...
- Name
- Phone number
- Street address
- Dig location
- Nearest Intersection
- Type of work
- Start date and time
...they were pretty quick about sending someone out and OK-ing her plans to dig.
Step 3: Track Down a Rack
A lot of the commercial bike racks you see are surface mount racks, meaning they're fastened to a concrete slab or anchored to asphalt. Mitchell could have gone that route with their household's rack, installing it on the concrete carriageway connecting the sidewalk to the curb.
"But the challenge there is, especially in the winter, even though my family doesn't park on the street, we keep our sidewalks clear, and people who drive cars really rely on having that opening," she says. "I didn't really want to put the bike rack there and impede on people being able to use that space."
Mitchell needed an in-ground rack that could go in the unpaved part of their boulevard (hence Gopher State One's involvement). Complicating things further, she'd learned that Uline, which makes a lot of the outdoor bike racks you see around town, is owned by right-wing megadonors who don't align with her family's values. (Here's a 2018 New York Times report on that couple—dubbed "the new Mercers"—and their growing influence on U.S. politics.)
People on Twitter instead recommended Dero, a locally based maker of commercial bike racks. This was promising—except that the company, which used to manufacture in Minnesota, doesn't anymore, meaning local pickup is no longer an option. The rack itself would have cost about $200, and shipping would have been another $200 on top of that.
Luckily, Mitchell discovered that Home Depot actually sells the same Dero rack—and their shipping costs were much more reasonable. (Like, $150 cheaper.)

Step 4: Install That Bike Rack!
"The instructions for actually installing it were a little bit... not specific," Mitchell chuckles. "I think they assume people who are doing this know what they're doing because they do it often—not an individual homeowner who's trying to install it."
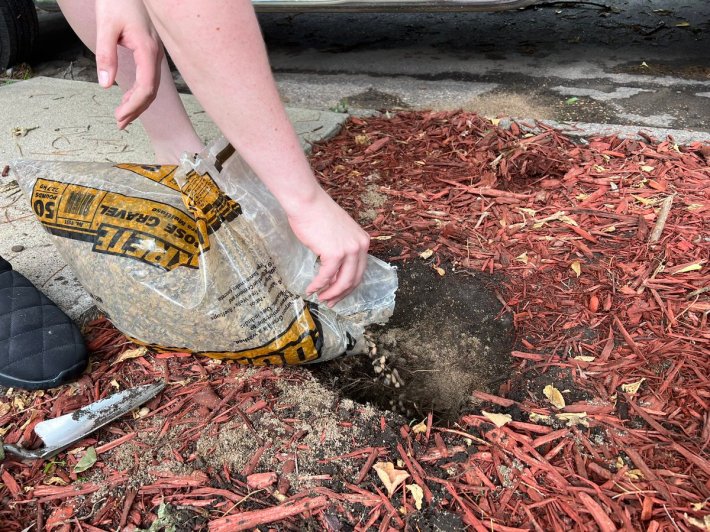
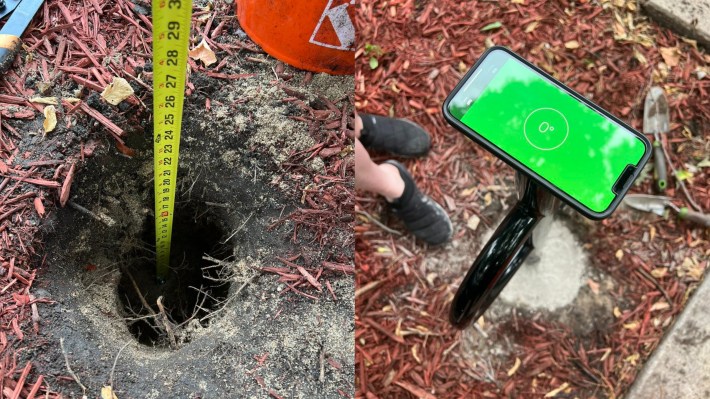
The process was more or less like installing a fence post. "If you had a post hole digger, that's what I would recommend," Mitchell says, though she was able to get the job done with a small garden shovel and a lot of elbow grease. She dug a 24-inch-deep by 12-inch-wide hole, filled half of it with Quikrete gravel mix, inserted the post and made sure it was level, and filled the rest of the hole with quick-setting concrete mix.
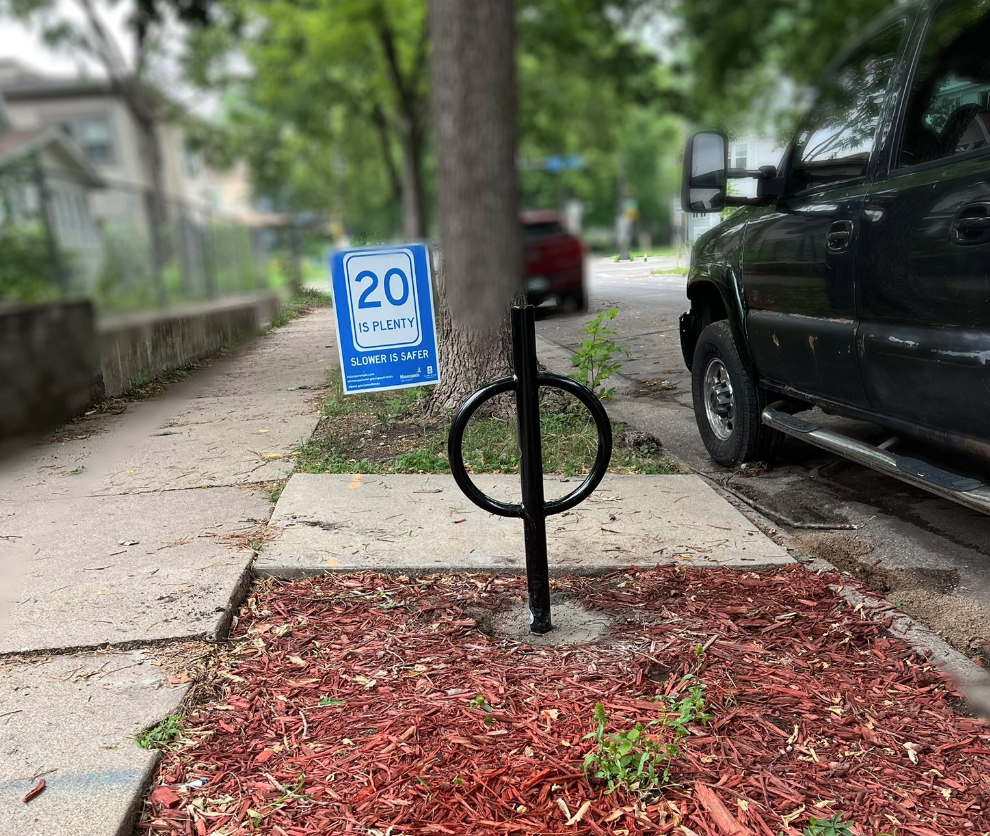
From there, it was a matter of adding water and making sure the rack didn't get knocked over until it set. Ta da—bike rack!
Step 6 (Optional): Celebrate!
Earlier this week, Mitchell's careful research and diligent hoop-jumping paid off. She officially installed her household's boulevard bike rack—and, as importantly, shared the news with the Twitter followers who'd been a big help along the way.
"I sent an announcement to all of our neighbors being like, 'We'd like to introduce to you the new member of the Mitchell household,'" she laughs. "I was like, they're gonna think I had another baby, but it's just bike parking.'"
All in all, the process took about two months. Mitchell sent her first email to Public Works on May 4, and she got the permit on May 23. Once that permit was in hand, she placed the order for the rack, which arrived in about a week despite the one-month shipping estimate. From there, it was a matter of having time to spend a day digging dirt, pouring concrete, and installing the rack.
Cost-wise, the whole project added up to a little over $300: roughly $250 for the rack, another $50 for the permit, and 12 bucks or so for the rocks and Quickcrete.
Mitchell hoped simply to communicate to neighbors that the bike rack was open to everyone—that it's in a public space and isn't just for her family. But, since so many people responded quickly and positively to ask how she did it, she's been thinking about how to get the word out beyond her block of First Avenue.
"I'm very much a person who cares about this stuff and was willing to spend the time and energy to figure it out," Mitchell says. "But it shouldn't be this complicated, you know? For people to not even know that it's an option?"
Residents are allowed to do this—so could the city add information about residential boulevard bike racks to its website? What about introducing bike rack subsidies for homeowners and apartment building owners like those that are available to schools and libraries?
"The city has a goal of, by 2030, having 60% of trips within the city done either by bike or walking, and we do have pretty decent bike parking, depending on the location, for commercial areas," Mitchell says. "But that's not all the trips people are taking! And if you're going to visit family or friends by bike... you want to know that there is secure bike parking at your location."


